


Julep It Girl Maven Box for February 2013
- Thursday, January 31, 2013
- By Missy
- 1 Comments
Hey Gang!
My Julep Maven box arrived yesterday in yet again, lickety split time.
I didn't have much planned for today so I figured I would do a little unboxing for you.
First up, lets see what I went with this month:


My Julep Maven box arrived yesterday in yet again, lickety split time.
I didn't have much planned for today so I figured I would do a little unboxing for you.
First up, lets see what I went with this month:

So I chose the usual, It Girl. It always consists of 3 polishes, and me being the uber polish skank I am, I want them ALL! This month we also got a free full size bottle of a new Julep Offering - Freedom Top Coat. They also had another new product out this month, Oxygen Nail Treatment, which I added on and ships separately. So I will have a separate post on that when it comes in (which is today).
Now lets see the goods in all their glory:

At first site - gorgeous gold tissue paper and the Julep literature cards that come with every box.

I've opened the tissue paper to reveal! A golden goodie bag, Freedom top coat in a cute box and my polishes wrapped in their usual paper bag and ribbon ensemble. Also some yum yum chocolate heart candies and the always lovely crinkle paper stuffing.

Here is everything unwrapped. Most every month Julep sends a little surprise gift in the box - this month it is a little travel eyelash curler. Pretty cute idea. Personally, I will never sway from my Shu Uemura curler, but it's a nice touch nonetheless, and perfect for travel or in your going out bag!

Here are the polishes that were available for the It Girl program this month, along with who they were inspired by:
Rebel - Named after Rebel Wilson, a stunning silver holographic
Joan - Named after Joan Crawford, a gorgeous plum rose with gold shimmer
Marion - Named after Marion Cotillard (love her!), a stunning teal blue with silver shimmer

A great shot of all that shimmer!

Freedom Top Coat, a polymer topcoat that cures with regular light that mimics a gel finish.

This is probably the best box I've ever gotten from Julep - I love every single color to pieces, and I did a test on the Freedom Top Coat that I will show you later!!
Hope you enjoyed - you can become a Julep Maven by clicking HERE to sign up with their little style quiz. You can receive your first Maven Box for Just ONE PENNY using code PENNY (the codes may be old and outdated, so if that doesnt work, try COLOR2012 or FREEBOX).

How appropriate is it that I'm drowning my nails in Slick Lacquer and it's pouring rain outside?
No better thing to do on a yucky, rainy day than paint, paint, paint!
So get ready to enjoy a little sparkly spam!!


Each of these polishes applied like perfection - some of the best indies I have tried. I had no issues with curling or sinking glitters or anything - picture perfect!
Slick Lacquer is available HERE - also please check out their Facebook page.
Suzzie has let me know she is currently running a special in her shop to commemorate hitting 100 Facebook Likes! You can use code 100LIKES at checkout to receive 10% OFF your order - valid until 2.2.2013
No better thing to do on a yucky, rainy day than paint, paint, paint!
So get ready to enjoy a little sparkly spam!!

Here are all the little goodies Suzzie from Slick Lacquer sent over for me to review! From Left to right we have: Houston, We Have a Party! - A Wink and a Nod - Gitsie. Something to note here, Suzzie makes all of her own labels by hand, sometimes using polishes to accent things (like the lips on the above bottle of A Wink and a Nod!) - My favorite thing was how each label was different and coincided with its shade. I love little touches like these.
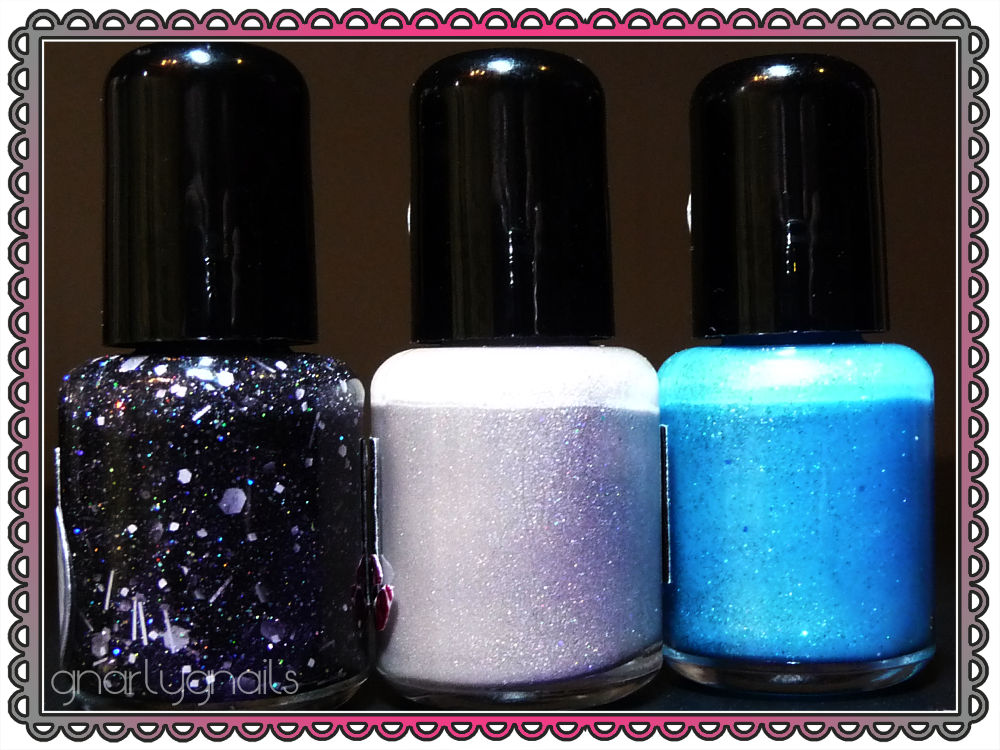
Some butt shots of the above polishes. Again, from left to right: Houston, We Have a Party! - A Wink and a Nod, Gitsie.

First up is Gitsie, here in her macro-lens glory. She is a 60s inspired aqua leaning blue polish full of iridescent, silver and green micro glitters. Its hard to tell, but thats what I see!

This is such a fun shade of blue, not too light or dark and such a pretty shade. Here Gitsie is shown in three coats with a top coat.

Gitsie really seems to glow from within, don't you think?


Oooooh LALA!! I love the shimmer in this, it is just the perfect touch.

Next up we have Houston, We Have a Party! ^^MACRO PORN^^

Here is a blurred macro so you can see all of the awesome holo particles in this polish! This is a charcoal black jelly base with black and white hex, bar and square glitters, intermixed with holo micro glitters.

I decided to spice this one up a bit, so I did a bit of striping with 3 polishes, so you can see how it looks over different colors. I used Essie No Place Like Chrome, Fingerpaints Black Expressionism and Catrice How I Matt Your Mother.

And with those 3 polishes, I did this little stripey deal here.

Then I added Houston, We Have a Party! over the top of the stripe design. I especially love the way the base of Houston transformed the silver into a greyish purple!

This is SUCH a cool polish with SOOOO many possibilities. Shown here I have 2 coats of Houston on over the striped mani. It is pretty sheer so I am not sure how many coats you would need to build to full opactiy, I would guess at least 4 and suggest you use a color base.

With flash, now you can really see the glossiness of the top coat and the holos. This one is a bit of a hungry glitter, I used Gelous and 1 coat of top coat to smooth it out.

Oh Houston....no problems here.

And lastly but surely not leastly - A Wink and a Nod - Macro shot.

A blurred macro to yet again show the gloriousness of holographic glitters. This is a nude grey super work appropriate shimmer polish. In boring light, it appears to have a silvery golden shimmer, but when the light hits it right it turns into a spunky disco ball!

I love a good nude polish, and this one nails it so well in the nude category.

Look at that shimmer!!! This is a gorgeous polish even without the holo effect it gives. I've shown it here in 3 coats with a top coat.

Sigh. This was my favorite of the three and will definitely be worked into my normal polish rotation!
Each of these polishes applied like perfection - some of the best indies I have tried. I had no issues with curling or sinking glitters or anything - picture perfect!
Slick Lacquer is available HERE - also please check out their Facebook page.
Suzzie has let me know she is currently running a special in her shop to commemorate hitting 100 Facebook Likes! You can use code 100LIKES at checkout to receive 10% OFF your order - valid until 2.2.2013
I don't guess this is talk so much as just a little ramble and something small that may or may not help you in your setup.
Depending on whether you are a fellow blogger, polish maker, nail tech or just enjoy to look at nails and paints yours for the hell of it, you may find this useful.
Let's say for about....2 years or so now I have been kindly bitching at my boyfriend to stop using my OTT lite. Mine is probably like most of yours, a child in a mans body that can't pick up after himself or turn a light off behind him. Case in point...he can't turn my light off whenever he is done or leaves the room.
It bugs me, its a good, expensive light and I don't want the expensive bulb to burn out.
Given, I've had this light for over 5 years, but thats not the point, right ladies?
Anyway, since getting back into my nails and taking photos, I have come to find in the last few months that he's put my light thru the ringer. He builds machines and is outside alot grinding metal and welding stuff, and he uses my light as a worklight when it starts to get dark. So you can imagine when I opened it up, my surprise at how gross and grimy dirty it had become.
Cut to this morning, we stopped in Walmart to grab a few snacks and were over the craft section when I saw this light. The first thing that caught my eye was the price, then I was like hmmmm I wonder if this Ott Lite is as bright as mine is. We proceeded to open it up and look and it looked pretty much like the same size bulb as mine, but where mine cost about 60 bucks, this one was $15.
But the selling point about this super cheap light was that it's a caddy!
So it can fit some nail stuff in there too!

It has an adjusting arm, that lengthens up to like almost 2 feet in height or so, and it comes outward also! SO lots of lighting options there!
With the separating compartments IN the caddy, it held 8 polish bottles.

Then here is the light pushed back down into the closed position, and the compartments removed! Now it holds 16 bottles of polish!
SO...pretty cool! It's 13 watts, and I had before this an OTT lite that was also 13 watts and it has been the one I've used for all of my indoor pictures.
$15 - Walmart - Craft Section.
Hope it helps someone, I know I'm excited I found it!
One thing I am loving about this newfound blogging approach I am taking is that I am writing my posts on the fly, in the moment. Before I had them stacked up for sometimes weeks in advance and never really connected with my readers. Now I just do a mani, and post the post when I get to it, no scheduling, no wondering what day it will fall on and what I should talk about for that day!
Enough blabber though - today is Sunday and its cold and warm at the same time here in Georgia.
It makes it hard for me to sleep, the constant covering up then uncovering. My cat makes it hard to sleep too, she's a total butthead. Anyway - it's winter, but it gets warm and you just never know what to expect. Because of that, I decided to do this unlikely bright lightning bolt design!
It's a pretty simple tape manicure technique - one straight piece of tape almost vertical down the nail, then a triangular piece overlapping it to make the zigzag.
I took this weekend to go through all of my polishes...I needed to shop my stash and see what I had, after going months without even opening the drawers, I'd forgottem most of what I even owned. So while I did that, I reorganized back to categorizing by brand (I used to do by color family) and I pulled out every polish I was at least 75% sure I hadn't worn before. Worn, I use that term loosely I guess. I mean, used as at least 50% or more of the manicure, not just a polka dot on a nail art design.
So this is what came of THAT project:
Given that I am going back to a different way of organizing, I knew that I would have a hard time using polishes I haven't before, so I am devoting the blog to alot of using up my polishes and trying to purge a lot of the dupes as I go.
So today, I did two manis, one of which I'm (finally) about to show you. And that knocks out 4 untried polishes! Woot!
Here we go, sorry for the bigmouth.

SO what do you think? Are you enjoying neons in winter or are you still rocking vamps or on to spring shades? I love em all, I do not care what time of year it is!
Enough blabber though - today is Sunday and its cold and warm at the same time here in Georgia.
It makes it hard for me to sleep, the constant covering up then uncovering. My cat makes it hard to sleep too, she's a total butthead. Anyway - it's winter, but it gets warm and you just never know what to expect. Because of that, I decided to do this unlikely bright lightning bolt design!
It's a pretty simple tape manicure technique - one straight piece of tape almost vertical down the nail, then a triangular piece overlapping it to make the zigzag.
I took this weekend to go through all of my polishes...I needed to shop my stash and see what I had, after going months without even opening the drawers, I'd forgottem most of what I even owned. So while I did that, I reorganized back to categorizing by brand (I used to do by color family) and I pulled out every polish I was at least 75% sure I hadn't worn before. Worn, I use that term loosely I guess. I mean, used as at least 50% or more of the manicure, not just a polka dot on a nail art design.
So this is what came of THAT project:
 |
| Yes, these are in fact, all of my untried polishes. I didn't count but I estimate somewhere in the 200 range. |
So today, I did two manis, one of which I'm (finally) about to show you. And that knocks out 4 untried polishes! Woot!
Here we go, sorry for the bigmouth.
 |
| So here we are, using Sinful Colors Savage and Julep Fiona - both of which are matte finish polishes. |
 |
| Julep Fiona, a gorgeous chartreuse neon that dries matte. I used two coats and I used it as the base for this manicure. It was a little streaky at second coat, but overall pretty good for such a bright neonish matte polish. I had issue with my tape ripping up the green later because I used a glue basecoat, so any sort of bumpiness you see is from that and not from the actual polish application. |
 |
| The green is pretty color accurate in these photos but the Sinful Colors Savage is definitely darker in real life and leans more teal in color. It covers well though, this is one thickish coat over Fiona. |
 |
| Finished off the mani with 2 coats of Color Club Vivid Top Coat just to get a bit smoother finish. |

SO what do you think? Are you enjoying neons in winter or are you still rocking vamps or on to spring shades? I love em all, I do not care what time of year it is!
The sun will always cheer you up, right?
- Friday, January 25, 2013
- By Missy
- 11 Comments
I'm going to start off this post by saying that wow...being holed up in your head for months and not doing things you were used to doing every day, sometimes multiple times a day, is not good.
I hadn't painted my nails since October. This mani I'm showing you today is the first mani I have done in over 3 months. It's not great or perfect, but it's something I thought I would feel comfortable with doing, aside from just doing a swatch of something.
A few months ago during the 30 Day Challenge, I did a polka dot mani that I really liked alot, so today I am showing you something I did using similar colors, since the colors were my favorite part of it.
I now bring you - Sunbursts!
 |
| Well...this didn't photograph exactly color correctly, but its close, the shades are a tad darker in real life. |
 |
| I achieved this look by first starting with my base color (the yellow, or your lightest color), after it was dry I added hole reinforcement stickers (yes, the kind in the office supply section that you put on notebook paper) - the trick to those is to really get them stuck down, they tend to lift on the corners, and I cut them in half to even help with that not happening. Such is life. After that, I take striping tape and run lines up from the hole stickers to the edges of the nail, then paint with the blue, or your darker color. Use a polish on top that can go opaque in one coat. |
 |
| They aren't perfect, which used to bug me. Now I just roll with it. Because the striping tape sat over the hole stickers and I didn't close that tiny gap up, the blue got under it a little in places and didn't give me the greatest lines, but in real life where you don't look through a macro lens, hardly noticeable! |
 |
| And here are the polishes I used - Sinful Colors Rain Storm and Bourjois Jaune Trendy. |


